
Oda’s finally given us an interior map of Onigashima. I think we’re not going to know the exact floorplan of the left and right brain towers for a while, if ever, but at least we know what to look for on the Performance Floor now. Up to this point, the enclosed space hasn’t allowed for many good high-angle establishing shots, which has made it hard to get a feel for the space and where everyone and everything is relative to each other in all the action up to this point. We’re already essentially going into our third volume of Onigashima, after all, and the fighting has been in full swing for a while. Let’s see if we can rationalise what we’ve seen so far with the current map:
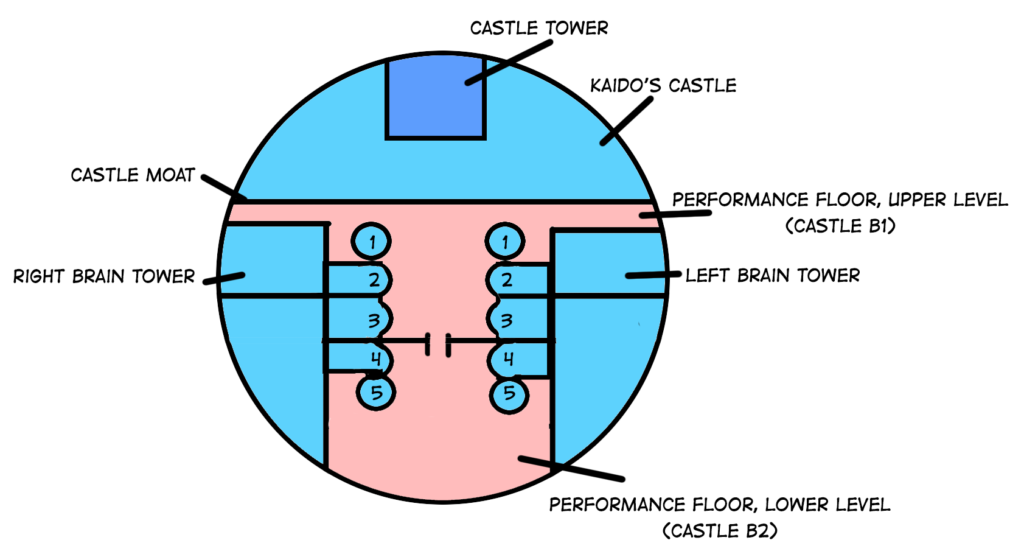
First thing to note is that the map in the manga (which I traced for this image) shows five buildings extending out from the left and right brain towers, all in the same shape. In actuality, the first and fifth buildings are freestanding turrets, and this has been show consistently in every panel so far, so I made that change on my map. I also found that some buildings were drawn with the rounded edges shown on the map while others were square, but I don’t think this has been managed as consistently. The relative heights of the buildings (and their heights in proportion to the Numbers) has also tended to shift from panel to panel. But shifting proportions are a longtime Oda thing. The layout at least is consistent.
The new chapter has the lower area of Performance Floor labelled as the Forehead Floor, but I’m skeptical that it’s actually in the forehead of the skull. The stairs leading in from the mouth really do not look steep enough for the lower floor to be above the eyes and there still to be so much cavernous space above the upper floor.
My interpretation of what we’ve been shown is that the upper floor is actually level with B1 of the central castle in the cross section shown in Luffy’s recent scenes. You can see the rock wall at the base in many, many different panels of the early battle. It logically follows that the lower floor (and probably the basement area Kaido and the Scabbards fell into before and Yamato and co fell into recently) are on level B2. But that’s my conjecture.
Anyway, let’s have a look at what’s actually happened in this area and if it can all be placed and tracked consistently. I’m paying particularly close attention to moments where buildings were damaged by the battle, because that kind of thing is particularly good for orienting and anchoring a scene when it’s shown consistently in the backgrounds, and stands out like a sore thumb if it magically goes away between shots (and we know Oda cares about that kind of thing, because characters like Minatomo and the Kablutermann were originally created to cover his ass when he did mess it up).
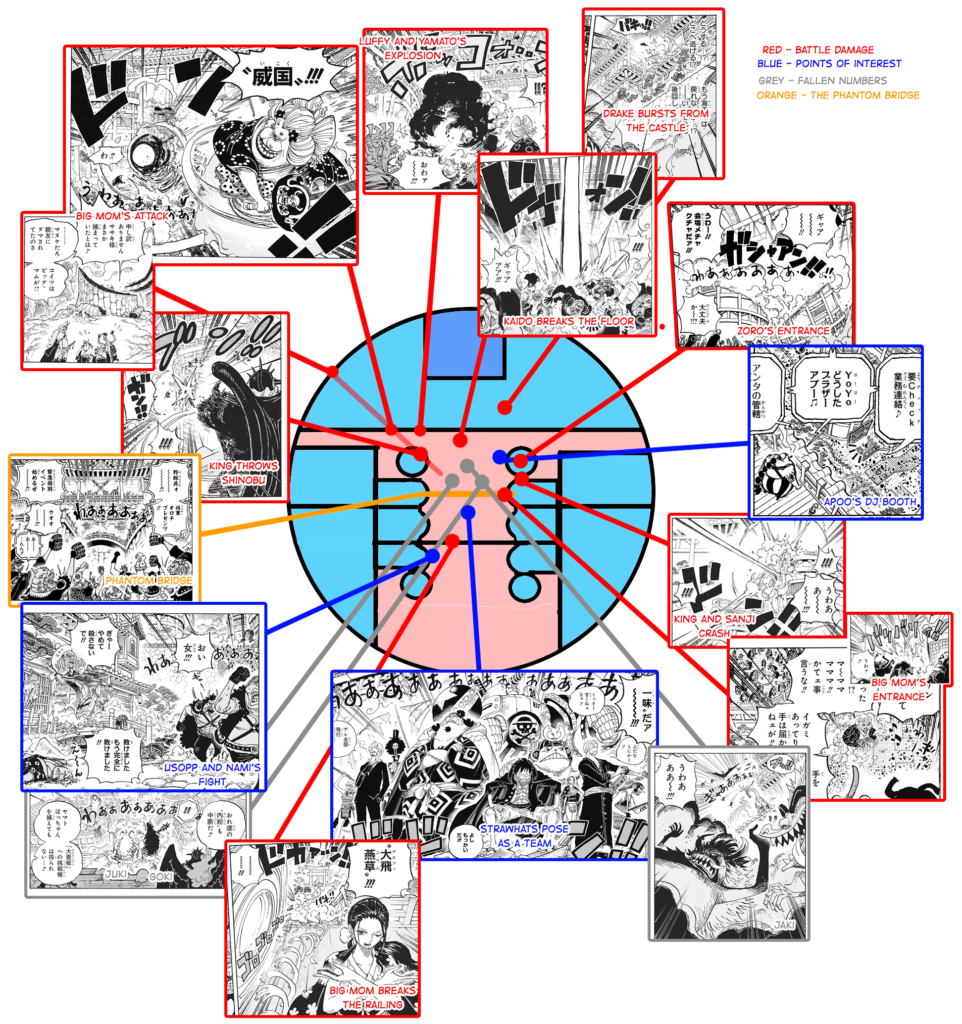
It shouldn’t shock anyone at all to hear that Oda has handled the continuity of the Onigashima battle incredibly well. The turret Zoro cut down is the most prominent bit of damaged scenery because a bunch of action has happened around it, but almost everything else has been shown at least once in chapters after the one it happened in, in the right location, and has never failed to be drawn when it should have. I find it supremely impressive, personally. The amount of coordination it must take between Oda and his assistants to not just keep the environment but the damage done to it accurate and consistent across so many chapters, panels and varying camera angles would be enormous. Props to them for doing it so well so far.
But getting things right is par for the course for Oda. Let’s have a look at where he’s slipped up, or intentionally fudged something for plot reasons.
First, and perhaps most obvious is what I’m calling the Phantom Bridge.
Many of the establishing shots inside the dome are framed with this bridge running right across the Performance Floor, usually connecting the second buildings on each side. This bridge has completely ceased to exist in recent chapters, presumably because it would get in the way of the Numbers’ movements. It’s possible it was knocked down offscreen at some point, but I didn’t have any luck finding evidence of that.
Second, the place Sasaki was tied up isn’t quite accurate to the exterior map shown when it happened. He’s implied to be under or just behind one of the skull’s horns, but in order for Big Mom’s attack that frees him to clip the right brain tower’s first turret and hit the main castle next to the hole Luffy and Yamato made, he would need to be further around the back than what was shown.
And third, the biggest struggle of mapping the battle was the placement of the Strawhats’ pose as a team moment. Most of the fighting at that point seems to be taking place between the first turrets, close to the base of the central castle. Jaki definitely falls in that area, and the crew appears to form up right in front of his body. But in the next chapter Luffy and Drake stop Juki and Goki’s advance between the second buildings, which means the Strawhats would have needed to finish the last chapter between the third buildings.
The most logical explanation is that the crew was fighting at the bottom of the castle, then fell back to regroup with the samurai before making a renewed push at the castle. It’s not the most in character thing for Luffy to make a tactical retreat, but it’s what makes the story works.
Finally, and less related to the interior map, I noticed in my rereading that the hole Kaido made in the roof is kind of a one way deal. We always see it when the camera in the dome pans up to the ceiling, but to my knowledge it hasn’t once been shown from the roof. Even more egrigious, it’s right in front of the castle tower, which has the door to the roof at the top. Jack’s reinforments for Kaido should have been at risk of tumbling straight through as soon as they arrived!
All in all, there have been a few hiccups in terms of character placement, but I was really impressed by the consistency of the environmental damage across chapters and from all different perspectives and camera angles. A lot of big fighting manga, like your Dragon Balls and your Narutos, limit their action to generic wasteland and woodland settings that look the same in all directions and make it impossible to keep track what the camera’s orientation is and whether there should be evidence of a past attack or skirmish there. Oda, on the other hand, is committed to his settings and sense of space. It makes the world so much more tactile and grounded.
by Captain__M

